Table of Contents

Most of the time when people talk about the Arduino they are really speaking about the Arduino Uno. The Uno is the most popular of the Arduino boards but it’s certainly not the only one.
There are about two dozen Arduino and Genuino boards that you can choose from to build your project around. Add to that all the different variations of clone boards and single-chip solutions and you’ll find that the Arduino Uno is just one member of a very large family..
Arduino & Genuino
Before we go through the Arduino family tree I think it’s important to clarify the difference between Arduinos and Genuinos. Essentially they’re both the same product, they are designed by the same Arduino company in Italy and manufactured in Arduino-approved factories around the globe. The difference is simply one of the trade name, in the United States the boards are referred to as Arduinos and everywhere else they are Genuinos.
Having said that most people, whether they are in the USA or not, refer to these products as Arduinos. So from this point forth we will refer to the devices as Arduinos.
Send in the Clones
As if the above wasn’t complicated enough the Arduino is an open-source design with both its circuitry and printed circuit board layout available in the Creative Commons. Because of this there are an enormous amount of Arduino clones manufactured all over the world, the bulk of them made and China and Taiwan.
Clone Arduino boards are generally cheaper than me the original object from Italy and for this reason they are often used in Arduino projects as replacements for the real thing. You certainly can’t blame someone for preferring to spend $12 for a new Uno over the $30 that Arduino wants for essentially the same device. Bear in mind that Arduino pumps a lot of their profits back into research and development and that they also maintain the Arduino editor which is used with all of these boards. So it might be nice to actually purchase a genuine Arduino or Genuino just to help out the effort, or at least make a donation on the Arduino site.
For the most part the clone boards will work identically to the Arduinos that they copy, however there are sometimes subtle differences. One big difference is that some clone boards will not sink or source as much current on their output pins. You’ll need to bear that in mind if you’re creating a design that takes a considerable amount of current from your Arduino.
The Uno

Arduino considers the Uno an entry-level product, in actuality it is the most popular Arduino configuration that there is. Its footprint will be familiar to anyone who has worked with the Arduino and most Arduino shields are constructed to fit on the Uno.
The Uno is often used as a prototyping board, with the final product built with a smaller Arduino or around an ATMega328 microcontroller chip which is the device which the Uno is based upon. You’ll find that most of the projects here in the DroneBot Workshop are based around the Uno and that all of the lessons in our “Beginning Arduino” series make use of an Arduino Uno.
The Uno has 14 digital I/O pins, 6 of which are capable of pulse width modulation (PWM) output. It also has six analog input pins. The board contains 32 KB of flash memory to hold your programs, half a kilobyte is used by the boot loader. There is also a small 2 KB Static RAM on the Uno.
The ATMega328 is clocked at 16 megahertz and full schematics and a printed circuit board layout for the Uno are available on the Arduino site.
You can power the Uno directly through the USB port which is also used to communicate with the host computer. Alternatively you can use the power jack on the Uno to supply 7 to 12 volts to the device. Its built-in voltage regulator will actually handle voltages up to 20 volts, however at higher voltages a lot of this energy will just be dissipated by heat so it’s a bit of a waste. The digital I/O pins can supply up to 20 milliamps of DC current.
Uno’s and Uno clones are available in a number of different configurations. On some devices the ATMega328 Is in a socket, allowing it to be replaced or to remove it to work in another circuit board. Other Unos have a surface mount version of this chip soldered directly to the board.
If you’re starting out with the Arduino I definitely recommend an Arduino Uno or a clone, it’s a great inexpensive way to enter the wonderful world of Arduino microcontrollers.
The Mega

While the Uno will suffice for many projects there are times where you need more I/O pins or more serial communications capabilities. This is a job for the Arduino Mega.
The mega is the bigger brother of the Uno. It sports a massive 54 digital I/O pins and 15 of these pins can be used for pulse-width modulation output. It also has 16 analog input pins.
The Mega is based upon the ATmega2560 Microcontroller and it has 256 kilobytes of flash memory to support much larger programs than the Uno can. It also has 8 kilobytes of SRAM and like the Uno it operates at 16 megahertz.
The Mega is a larger device than the Uno but the pinouts have been kept the same, the Uno pinouts are a subset of the Mega pinouts. This allows the use of the same shields designed for the Uno on the Mega.
As with the Uno the Mega can be powered off of its USB port or via an external 7 to 12 volt power supply
So if you’ve got a project that’s a bit too big for the Arduino Uno than the Mega is what you want to use. One thing you’ll find this device used for a lot is as the heart of a 3D printer.
The Nano


On the opposite end of the scale we have the Arduino Nano, a smaller Arduino that can be used when space is tight. Despite its small size the Nano sports a number of input and output pins, strangely enough it actually has more I/O pins than the Arduino Uno.
Some of the Nanos size reduction is accomplished by using a 4-layer circuit board as opposed to the two layer board used on Uno’s and Megas. The Nano also has surface mount components mounted on both sides of its board and, unlike Uno or Mega, the Nano uses pins as opposed to socket connectors. The USB port on a Nano is a Mini-B USB port. The Nano is not compatible physically with the shields used for the Arduino Uno As it has a much smaller footprint.
But good things do indeed come in small packages. The Nano has 14 digital I/O pins, six of which can be used for pulse-width modulation – this is exactly the same as the Arduino Uno. The Nano also has eight analog input pins which is actually two more pins than the Uno has! It has a smaller 16 kilobyte flash memory (although some Nanos have a 32 kilobytes flash memory). Some Nanos only have 1 Kb of SRAM while others have 2 kilobytes.
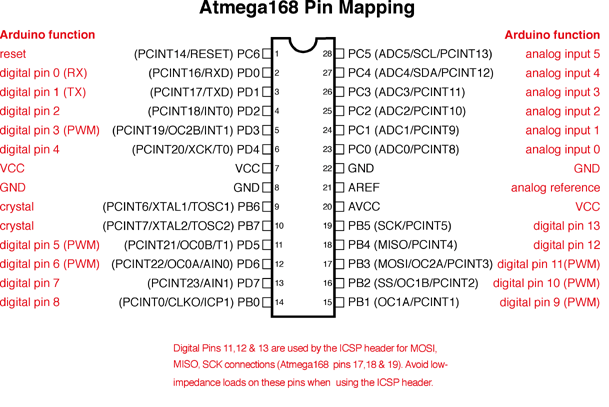
The different configuration among the Nanos is due to the fact that there are actually two different processors used in their design. Some Nanos use the ATmega168 while others use the same ATmega328 used in the Uno. Both versions are clocked at 16 megahertz.
if you’re looking to miniaturize your design then the Nano is an excellent choice.
The Micro

If you like to have a board that’s even smaller than the Nano then there’s the Arduino micro. this is the smallest of the official Arduinos. It’s tiny form factor makes it easy to snap into a solderless breadboard.
The micro uses the 18 Mega 32 you 4 processor. this processor has built-in USB Communications and so unlike the other arduinos the micro does not have a separate USB kit. the jest of this is that the micro can appear to be connected to the computer as a mouse or keyboard which opens up a number of additional possibilities for your design.
micro has 20 digital I/O pins of wood 7 can be used for pulse-width modulation and 12 can be used as analog inputs. it has a micro USB connector on it and its small form allows it to easily be placed on a breadboard or small circuit board.
The Gemma

The Gemma is a very tiny microcontroller which is based on the ATtiny85. It is designed to be used with wearable computing products and is built on a circular circuit board with 6 large external pad connectors around the end of the board. This allows the use of conductive thread to connect other devices to your Gemma.
The Gemma has 3 digital input output pins, two of them can be used for pulse-width modulation and one can be used as an analog input. It runs at 8 megahertz and features a micro USB connection as well as a small JST connector for a 3.7 volt battery.
The Gemma is one of the quickest ways to start developing wearable technology!
The LilyPad

Like the Gemma the LilyPad has been designed for wearable projects. It is also similar to the Gemma in that the circuit board is circular and features a number of large pads to which you can attach conductive thread. It differs from the Gemma in that it is more powerful and has several more connection pads.
The LilyPad is available with two processors, the ATmega168V or the AYmega328v,. these are both low-power editions of the processors used in the larger Arduino boards. The LilyPad runs on a 2.7 – 5.5 volt power supply and has 14 digital I/O pins, six of which can be used for pwm. It also has 6 analog input pins. Like tthe Uno it has 16 kilobytes of flash memory, however the LilyPad is clocked at only 8 megahertz.
The lLilyPad is the Arduino of choice for sophisticated wearable devices.
Single-Chip Solutions
Well not really Arduinos the ATmel processors used to build the Arduino devices can also be used by themselves to create custom circuit boards with a minimum number of components. You could actually build your own Arduino or use an existing Arduino to program a chip which you then run on its own.
Stay tuned to this site as we will have articles about building your own Arduinos using the AmTel chips on their own.
Pick your Arduino
As you can see from this article there are a variety of Arduinos to choose from. As they share a common code base is possible to develop code on one device and then move it to another one. This makes the Arduino series of microcontrollers one of the most versatile devices available.
Ao pick your Arduino and start building today!
Can u do a series on uploading sketches on Arduino am unable to upload keep getting Avratk 500v2 receivemessage timeout can u help so can get led to blink thanks in advance Eddie in Cape Town South Africa
I have switched to the NANO 33 BLE and find it difficult to make sure that components are compatible with it. Example MCP23017.
If you could explore that very powerful processor it would be great.
Thank you for providing all of you educational packages on Arduino and Raspberry Pi. I consider you to be a very good teacher because of you completeness, clarity, and brevity.
Excellent tutorials! Do you plan to have something soon about the Huskylens (DFRobot)?
This is a wonderful site, thank you so much for all your time and effort, it has helped me with a number of home projects that I have
Have you considered doing an article on cnc machines using the Arduino uno with a cnc shield. i appreciate that its a huge subject having built one myself, and requires using a lot of apps such as Eagle, flatcam, Inkscape and gcode sender. There are as you can imagine, a lot of tutorials already out there, but the majority of them are not very well presented and of poor quality. I have followed many of your tutorials and found them to be of a high professional standard. As such, i believe a tutorial from you on CNCs would be a… Read more »
Thank you for your effort to teach us. I love your workshop.
keep up the lessons
I love your projects. I still can’t find any sketches for attiny. I would love to find out more about this little board and start creating projects for it.