
Table of Contents


The Arduino IoT Cloud is one of the easiest ways for hobbyists to create projects for the Internet of Things. We have used it many times in the DroneBot Workshop, and during that time, the product has evolved considerably. In fact, it now has an entirely new user interface.
So today, we are heading back into the cloud to see what’s new with the Arduino IoT Cloud for 2024!
Introduction
The Arduino IoT Cloud, a platform designed to simplify the development of IoT applications, has recently introduced a host of new features. These updates include improved device management options, enhanced security measures, and expanded compatibility with a broader range of hardware well beyond the Arduino and ESP32 boards that were initially supported.

Today, we will look at the state of the Cloud at the beginning of 2024. We’ll check out the new dashboard, examine the new features, and, of course, build a few cloud apps ourselves.
Arduino IoT Cloud
The Arduino IoT Cloud was launched in beta in late 2018 and was officially released in February 2019. With its release, electronics experimenters, students, and makers gained access to a powerful platform that simplified building IoT applications.
Building IoT applications with the Arduino IoT Cloud is pretty easy; in some cases, you don’t even need to be proficient at coding, as the IoT Cloud can autogenerate sketches for you.
You will, however, need to understand the fundamentals of how an IoT Cloud project is structured. Let’s go over that now.
Devices
Devices in the Arduino IoT Cloud refer to “virtual twins” of the physical hardware components, such as microcontrollers and sensors, connected to the cloud platform to collect and exchange data.
Every Device you wish to use will need to be added to the cloud. This is a simple procedure, and Arduino has a wizard that walks you through the process. During this procedure, you will be given the opportunity to change the name of your device. You’ll also get a set of public and private security keys, which you will need to keep in a safe place as they are needed in the “Things” process, which will be described in a moment. You can copy these keys to your clipboard or download a PDF document containing them.
You’ll need to install the Create Agent on your computer to allow access to your device; you’ll also need the agent to allow you to program your boards with a direct connection. The agent is a simple application available for Windows, Linux, and macOS. If you don’t have it installed, you’ll be prompted to do so when you try to add a device.
There are many microcontroller and microcomputer boards that you can use as “Devices” on the Arduino IoT Cloud. Arduino is constantly adding new devices to the list, which you will find on their IoT Cloud Compatible Boards page.
You can also add just about any device that works with Python or JavaScript. And you can connect to Internet APIs as well.
Things
No, these are NOT the same “Things” Dr. Seuss wrote about in the “Cat in the Hat”! And while these “Things” can’t sing like the cartoon ones, they are actually much more useful.
“Things” are the virtual representation of connected devices and their associated data. You can think of them as a glue that binds your devices to the Dashboard.
You need to associate a Device with a Thing. You will also need to provide your Wi-Fi network login credentials, and it is during this procedure that you’ll need to use the Private Key that you (hopefully) saved when you created your Device.
After that, you can add “Cloud Variables” to your Thing.
Cloud Variables
Cloud Variables are variables that exist within the Arduino IoT Cloud. They are configured within your “Thing” and used in your sketches and the Dashboard you can build to monitor and control your project.
As with “regular” variables, there are many different types of cloud variables. You can choose from conventional types like booleans and integers or use one of the exclusive cloud variable types like temperature.
When you create a Cloud Variable, the IoT Cloud automatically writes all the code required to accommodate it. All you will need to do is use the variable in your code.
Cloud Variables can be read/write or read-only. They can be updated periodically, or they can be updated whenever they change value.
In your “Thing,” you can add as many Cloud Variables as your project requires. You can also monitor the current value of the variables.
Dashboards
The Dashboard is your control center for your cloud applications. You can use dashboards with a web browser or the Arduino IoT Cloud Mobile App.
A dashboard does not need to be associated with a specific Thing or Device. Instead, you can combine data from various sources into one dashboard.
A Dashboard is composed of various “widgets.” A widget is a dashboard control or monitoring item, such as a gauge or push button. Each widget is associated with one (or sometimes more than one) cloud variable, and variables and widgets are updated concurrently.
A web and mobile version will be created when you build a dashboard. You can edit each of them independently so that you can arrange the widgets in a manner you find most useful. The mobile version is displayed in the Arduino IoT Remote App, available on Google Play and the Apple App Store.
Triggers
Triggers are a relatively new function in the Arduino IoT Cloud. They are powerful and very easy to use.
A trigger can be fired with a cloud variable. Only boolean and string variables are currently supported. When the cloud variable matches a preset value, the trigger is fired.
You can use triggers to send the following types of messages:
- Email messages.
- Push Notifications to the IoT Remote App.
You can set up triggers for any of your cloud projects. You can also look at your triggers’ historical record on the console’s Triggers page.
Cloud Console Tour
The Cloud Console is your method of interacting with the Arduino IoT Cloud. It’s a “one-stop shop” for everything you’ll need to build an IoT application.
You can navigate to the Cloud Console from within the Arduino website, or you can go directly to the Console at https://app.arduino.cc/
The console is one of the biggest changes in the ArduinoIoT Cloud product. It integrates a number of smaller control panels and also has links to documentation, tutorials, and other educational material.
A menu on the left side of the console allows you to navigate through all the cloud screens. You can return to this menu anytime; if it isn’t displayed on the left, there will be a box you can click on in the top left corner to display a “floating” version of the menu.
The menu items are as follows:

Home – Your home page. This lists the files you have worked on recently and links to tutorials and documentation to help you get started with the cloud.

Sketches – A list of all the IoT Cloud sketches you have created. You can also see which Devices are associated with each sketch. You can also create a new sketch or folder or import a sketch using the Create button on the top right.

Devices – A list of all your Devices. Each Device’s status (online or offline) is displayed along with the type of hardware and the associated Thing.

Things – A list of your Things, the Device they are associated with (and the Device status), the Sketch associated with it, and the date of creation and last modification.

Dashboards – A list of the Dashboards you have built. You can also rename, delete, or duplicate each Dashboard from this screen.

Triggers – This is the page where you can create new Triggers. The page lists all of your existing Triggers and also allows you to turn them on or off. There is a second tab that displays the history of the Triggers that have been activated.

Resources – Links to various resources, including the Arduino Forum and Project Hub. Documentation and starting guides are also linked here.

Courses – A list of courses for all levels and ages. Many of these courses are associated with kits, which you can register on this page. Note that while many of these courses are free, there are also paid courses on this list. Educators will want to make note of the Arduino School Plan offered here.

IoT Templates – A collection of ready-to-use templates for your Arduino IoT Cloud projects. Check them out; you’re sure to find something interesting!

Integrations – You can integrate other applications, such as Edge Impulse, with the Arduino IoT Cloud. Your integrations are listed here.
Plan Usage – A count of the Compilations, Storage, Things, and Triggers associated with your account.
Building a Cloud Project
We will build a cloud project to become familiar with the Arduino IoT Cloud. While our project won’t exactly do anything useful, it will illustrate all the steps required to work with the Arduino IoT Cloud.
Our First Cloud Project
The layout of our project is illustrated here.
We will have a device with two peripherals, a servo motor, and a momentary-contact switch. Our device will connect to the Arduino IoT Cloud, and we will construct a Dashboard to interact with it.
I will use an Arduino Uno R4 WiFi board as my first device. If you don’t own a Uno R4 WiFi board, you could use another cloud-compatible Arduino board like a Nano ESP32.
We will connect a servo motor and a pushbutton switch to the Uno. I have also wired in a 6-volt power supply for the servo, as I’m not fond of using the Uno 5-volt output for this.
Here is the wiring diagram for our first device:

Joining the IoT Cloud
Our device, the Uno board, in our case, needs to be added to the IoT Cloud. We can do this in the console.
Use the menu on the left side to find and select Devices. The page that opens will list all of the devices that you have added to the cloud. If this is your first one, it will contain some instructions instead.

Look for a button in the top right corner; this is the Add Device button. Click it, and a dialog box will open. You will have three choices here:
- Arduino Board – Any IoT Cloud-compatible Arduino board. The code will be in C++, and the IoT Cloud will auto-generate a sketch for the device.
- Third-Party Device – Devices like the ESP32, ESP8266, Pelion, or an Arduino LoRaWAN device. The code will be in C++, and the IoT Cloud will auto-generate a sketch for the device.
- Manual – Any device that can communicate using Python, MicroPython, or JavaScript (NodeJS). You will write the code yourself.
Since we are using an Arduino Uno R4 WiFi board, we will select the first one, Arduino Board.
At this point, you will need to connect your board to your computer’s USB port so the utility can discover the board and install some software onto it. It does this using the Arduino Create Agent utility, a small app available for Linux, macOS, and Windows. If you don’t have the utility installed, you will be prompted to do so. It’s a quick and easy installation.
The Arduino Create Agent is the “glue” between the web-based ArduinoIoT Cloud application and your computer’s USB port. It will run when your computer is started, and you’ll see an Ardiono icon in your taskbar.
Once the application finds your board, it will display its details. In the rare case when it fails to discover the board, you should unplug it from the computer and plug it back in again. Once your board is detected, click the Configure button to start the configuration process.
On the next screen, you can give your device a name. A name will be suggested, but you’ll probably want to choose one that fits into your own naming scheme.

The next screen provides you with a Secret Key, as well as a Device ID. The Secret Key is very important, and you MUST save it, as it will be required to create a Thing associated with your device. If you lose the Secret Key, you must delete the device and start over from scratch!
You can copy the key directly from the screen or download a PDF document with the key. If you are creating many devices, you may want to use a spreadsheet to store all the keys.
As this is a “secret” key, you should not share it, as it’s integral to the security of your device. If you are wondering why I have published my key in this article and on the video, it’s because by the time you read this, the device will be deleted (I’m only using it for the article and video).

After copying the key, you need to check the confirmation box before you can continue the setup process.
The next step is the final step. The IoT Cloud will add your device and copy some connectivity module firmware to your board. The procedure can take several minutes on some boards, like the Uno R4 Wifi we are using. You may be prompted to unplug and reconnect your device later in the process.

You should see your new device if you check your Devices screen. Its status will be “offline,” which is expected as we have yet to connect it to your network.
Building a Thing
Now it’s time to build the Thing associated with our new device.
Navigate to the Things panel in the cloud console and click the green button in the top right corner. This will open the Thing configuration page.

This page has three sections:
- Cloud Variables
- Associated Device
- Network
Before you begin configuring your Thing, it would be a good idea to give it a name. Currently, it is named “Untitled”; click on the name, and a dialog box will open. Use that box to name your Thing.
Associated Device
The Associated Device is the first item that you need to configure.

Click on the Select Device button. A dialog box will open, listing all of your devices. Devices already associated with a Thing will be greyed out; you can only select a non-associated device. Select the Uno R4 WiFi device that you just created.
Network
Now that you have a device associated with your Thing, the Network button will be enabled. Click on this button to configure the device’s network connection.

The dialog box that opens requires three parameters:
- Wi-Fi Name – The SSID of your network.
- Password – Your network password.
- Secret Key – The Secret Key you saved when you created your Device.
Provide the required information and click the Save button.
Cloud Variables
The final step on the Thing Setup page is to add cloud variables. To do this, you should consider the components you need to interface with.
The Uno R4 WiFi board we added as a device has two peripherals connected to it:
- A servo motor
- A push button switch.
To control the servo motor, we must send data from the cloud to the device. The push button, on the other hand, sends data to the cloud. Keep this in mind when you create cloud variables.

We will start with the push button. Click on the Add button to create your first cloud variable. A dialog box will open with several selections. Fill them in as follows:
- Name – button_state
- Type – Boolean
- Variable Permission – Read Only
- Variable Update Policy – On change
Click the Add Variable button when you are done.
The button name and type are pretty self-explanatory. The permission is set to read-only, as the cloud only needs to read the button and never writes to it. It is very important to get that right!
We update on-change as we want to update the cloud every time the button state changes.
Now, let’s create another cloud variable for the servo motor. Follow the same steps and use the following parameters:
- Name – servo_position
- Type – Integer
- Variable Permission – Read & Write
- Variable Update Policy – On change
Note that the servo motor variable is read and write, as we must write to it from the cloud (we never actually read it). The integer value from 0 to 180 sets the servo position.
Cloud Project Editor
The eagle-eyed amongst you may have noticed that the “alert bell” in the corner of the Thing page turns red when you add cloud variables. This is because the IoT Cloud has auto-generated code to go with each of them.
The second tab on the Things page is the Sketch tab. If you open it, you will see the sketch the IoT Cloud generated for you.
As of this writing, the tab opens the “simple editor,” you can select the ”full editor” with a button on the top. But at the end of March 2024, the simple editor will be removed, and the full cloud editor will be your only option. So don’t fall in love with the simple editor; it will only lead to heartbreak!
Click on the Open full editor button to open the cloud editor.

The cloud editor has undergone many updates, and its appearance is getting closer to that of the desktop Arduino IDE.
You will note that there are actually four files in your sketch. Their purpose is as follows:
-
- Main Sketch – By default, this will be named after your Thing, but you can edit the name. This is where you will write all of your code.
- ReadMe.doc – This is a text file that you can edit to provide a description of your project.
- thingProperties.h – This code supports the Thing and is generated by the Arduino IoT Cloud. Do not edit this file! This file loads two libraries, ArduinoIoTCloud.h, and Arduino_ConnectionHandler.h.
- Secret Tab – This tab has your network connectivity information and your secret key. Again, do not edit this file.
Look over the code generated by the Arduino IoT Cloud. You will note the following:
- The comments at the beginning describe the two cloud variables we defined in our Thing.
- The “thingProperties.h” file is included.
- In Setup, the serial monitor is started with a delay.
- The initProperties() function is called from “thingProperties.h”.
- A connection is made to the Arduino IoT Cloud using ArduinoCloud.begin(ArduinoIoTPreferredConnection)
- The debug level is set with setDebugMessageLevel(2). You can change the number for more (or less) information if required.
- Debug information is printed to the serial port with ArduinoCloud.printDebugInfo().
- In the Loop, ArduinoCloud.update() is called to update the cloud variables.
- A function has been created for the servo motor.
That last function is what is called a “callback function.” It is called every time the value of the function’s associated cloud variable changes. If we had set that variable to be updated periodically instead, it would be called at the beginning of every period.
So if the value of servo_position is changed in the cloud, this function is called. Keep that in mind for the next section.
Cloud Project Servo Code
The code we looked at is complete. You can load it up to your Arduino Uno R4 WiFi board, which should connect to the network. After a few seconds, you should observe the device status changing to online.
But the code doesn’t allow us to do anything with the device and its peripherals; it only sets up the framework. To actually do something, we will need some code.
We will start with the servo motor code first; after that, we will focus on the push button.
As with most sketches that use a servo motor, we will start by loading the servo library and defining a servo object called “myservo”:
|
1 |
#include "Servo.h" |
|
1 2 3 |
//Define an object for servo Servo myservo; |
In the Setup, we connect the servo to pin 11 (we could have also defined a variable for the pin).
|
1 2 3 |
// Attach Servo myservo.attach(11); |
And now, we need to manipulate the servo motor. As you recall, the cloud variable servo_position is used for this.
This is where the callback function that the Arduino IoT Cloud wrote for us comes in. Remember, it is called every time the cloud variable servo_position changes. So, all we need to do is tell it to set the servo position using the variable value.
|
1 2 3 4 5 6 7 8 9 |
void onServoPositionChange() { // Add your code here to act upon ServoPosition change // Move the servo motor myservo.write(servo_position); } |
That’s all we need to do! Load everything up to your Arduino Uno R4 WiFi board, and we can move on to the next step, building a dashboard.
Building a Dashboard
Navigate to the Dashboards menu item in the cloud console and open it. Click the green button in the top right corner to create a new Dashboard. You’ll be presented with a blank dashboard with a toolbar containing a button and a few controls.
You’ll need to add a widget to work with the servo motor, so click the Add button. A drop-down menu will list all the available widgets. There is also a tab to add Things directly, creating a Dashboard with a default widget for every cloud variable in the Thing.
Add a Widget
Let’s pick a widget from the drop-down for our dashboard. We need something that can set the value of the servo_position cloud variable from 0 to 180.
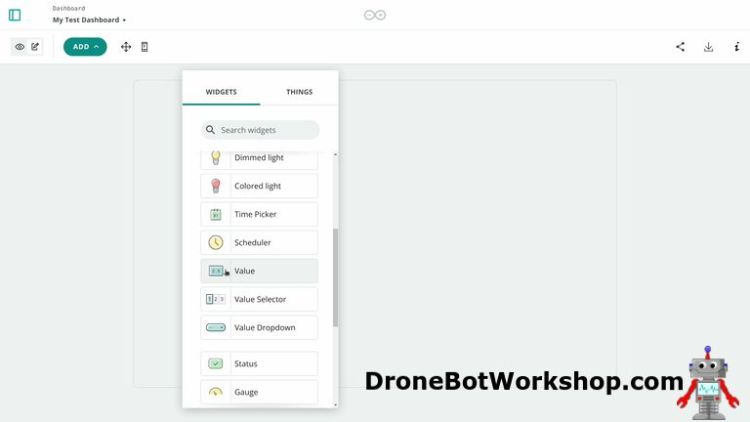
There are a few widgets that will do the job. A good choice is the Value widget, which lets you type in the value you want to set the variable to. So scroll down the list and select Value.
The Value widget settings panel will open, and the widget name will be “Value.” You can overwrite this; I relabeled it “Servo.”

We can link our widget to a cloud variable by clicking the Link Variable button.
The Link Variable page has two columns. In the left column is a list of all the Things you have constructed. If you select one, its cloud variables appear in the right column. Note that cloud variables that are incompatible with the widget will be greyed out. In our case, the button_state variable is a boolean, which isn’t compatible with this widget. So when you select our Thing, your only choice is the servo_position variable.

Select the servo_position cloud variable, and exit the widget settings page.
And that’s it, you have added a widget! Try it out by typing a number from 0 to 180 into the text box and pressing enter.
You should see the servo motor move to the position you entered into the widget.

This should show how easy it is to add a widget. Note that in our simple demo, we are not making any effort to prevent numbers above 180 from being entered, so keep your entries between 0 and 180.

Slider Widget
Let’s try another widget, one that we can restrict to the 0-180 range. Click the Add button to display the widget list, and select the Slider widget.
We will link the Slider to the same cloud variable we used with the Value widget. You can link a cloud variable to as many widgets as needed. Click the Link Variable button and link the servo_position variable to the widget.
Before you exit the Slider settings, you must make one more edit. Look at the Value Range at the bottom of the settings page (you may need to scroll down to see it).

Here is where we can set the range of the Slider control. The keen observers amongst you may have noted that before we attached the cloud variable, the range values included decimal points. After we linked to an integer (which is what the servo_position cloud variable is), the range values are now integers. Widgets are pretty clever!
Keep the minimum value at zero, set the maximum to 180, and click the Done button.

Now, we have two controls that can move the servo motor. The Slider is restricted to zero to 180, so it won’t exceed the servo limits. Play with the controls and note the following:
- Both controls track one another.
- Each control is capable of reading or writing the value.
You can resize and reposition the controls to your liking.


Mobile Dashboard
When you assemble a dashboard, you actually create both a desktop and mobile version. You can view the mobile version by clicking on the icon on the taskbar.
You can reposition and resize the controls on both dashboard versions independently.
The dashboard is visible on the Arduino IoT Cloud Remote App.
Using Desktop IDE 2.x
Let’s see what we have done so far:
- We have wired up an Arduino Uno R4 with a push button switch and a servo motor.
- We connected this board to the Arduino IoT Cloud as a Device.
- We created a Thing to represent this device on the cloud.
- We wrote code to interact with the servo motor.
- We created two Cloud Variables to manage the push button and servo motor.
- And we built a dashboard and added Widgets to control the servo motor.
So, it would seem that the next step would be to get the push button switch working. To do this, we need to:
- Write some more code to interact with the push button switch.
- Add a widget on the Dashboard to display its status.
We could, of course, go back to the online code editor, update the sketch, and then download it to the Arduino Uno R4 WiFi board. But there is another way of editing the code. Instead of using the online code editor, we can use the desktop Arduino IDE.
Using IDE 2.x with the IoT Cloud
Benefits of using the desktop version of the IDE to write your code include familiarity with the development environment and the ability to work while disconnected from the Internet (to some degree).
I assume you already have the Arduino IDE 2.x installed on your computer and are somewhat familiar with its operation. I also assume the Arduino Uno R4 WiFi board is still connected to your computer.
Open the desktop IDE and select the Uno board if it isn’t already selected. Next, click the Sketchbook icon (which looks like a folder) on the left menu bar. You will see a list of the sketches you have worked on locally on your computer.

At the top of the list are two icons: a computer and a cloud. Right now, you are looking at the computer. Click the cloud icon.
The first time you do this, a Sign In button will be displayed instead of a list of sketches. Click on this to open a browser window on the Arduino login page. Login to your Arduino account; once you have successfully signed in you’ll get a message saying you can close the browser window.

When you return to the IDE, you will see that you now have a list of your sketches on the Arduino IoT Cloud. Please note that these sketches are still on the cloud, not your computer.
Pulling Down a Sketch
You cannot edit a sketch directly in the cloud; you must “pull” it down to your local computer if you wish to edit it. These sketches will be saved in a special folder maintained by the Arduino IDE; the exact folder depends on your operating system.

You will note that the sketches all have an “empty cloud” icon beside them. This indicates that they are only in the cloud. You should see the sketch we have been working on in this list; if you are just starting, it will be the only one on the list.
If you hover your mouse over the item in the list, a second icon will appear on the right of the title text, an icon that looks like a cloud with an arrow pointing down. This is the “pull” icon, and if you click on it, you can pull (download) the sketch and open it up in the IDE.
Once the sketch has been pulled down, it will open up. It will include the support files we saw when we worked with it using the cloud editor.
Note that any changes you make to the sketch will not be reflected in the cloud; this is an independent copy on your own workstation. If you want to update the cloud with your changes, you must “push” the sketch back up. We will do that in a bit, but first, we must edit our sketch and add the code to make the push button functional.
Add the Push Button Code
The code we will use for the push button today is not the best way to accomplish the task, but it is the easiest. I ask your forgiveness as we are here to learn about the Arduino IoT Cloud and not coding techniques!
We will begin by defining a pin for the pushbutton.
|
1 2 3 |
//Pin for pushbutton const int buttonPin = 5; |
In Setup, we will set the pin as an input with an internal pullup resistor.
|
1 2 3 |
// Defne pushbutton as input with pullup pinMode(buttonPin, INPUT_PULLUP); |
And in the Loop, we will read the input, invert it, and then assign it to our cloud variable.
|
1 |
button_state =!(digitalRead(buttonPin)); |
And that’s it! Save your code as you always do.
Compiling and Uploading
Now that you have edited and saved your code, it is time to compile it and upload it to the Arduino Uno R4 WiFi board.
Before you do that, however, you will need to install a few Arduino Cloud libraries on your computer. Without them, your sketch will fail to compile.
Open the Library Manager (the “books” icon) and search for “ArduinoIoTCloud.” The
ArduinoIoTCloud by Arduino will be your first selection; that’s the one you want. Select the library, and you’ll be prompted to also install a long list of dependent libraries. Go ahead and do this; it doesn’t take very long.
Now, you should be able to compile the sketch and upload it to your Arduino Uno R4 WiFi board.
Pushing Sketch to the Cloud
A final step you will want to do is to “push” your modified sketch back up to the Arduino IoT Cloud. This will bring the cloud copy of the sketch back in sync with the local copy and allow you to continue working on the sketch using the cloud editor if you wish.
Pushing a sketch is similar to pulling it. Go back to the Sketchbook, open the Cloud Sketches, and find your sketch. Hover over it to see a couple of icons. The one on the left is the “pull” icon you used to pull the sketch from the cloud. The one to its right is a “push” icon, a cloud with an arrow pointing inward.

Click on the push icon. You will be informed that you are about to overwrite the cloud copy. Acknowledge the warning and proceed. The sketch will sync back to the cloud.
Working with the Push Button Cloud Variable
Now we have the code on the device updated to interact with the push button and change the state of the button_state cloud variable. Let’s work with that variable.
Open the Thing you built and verify that the associate device (the Uno R4 WiFi board) is online. Now, look at your cloud variables. You should have two:
- button_state – A Boolean representing the push button. It should be HIGH when the button is pressed.
- servo_position – An Integer that sets the servo motor position from 0 to 180 degrees.
Beside each variable are two values:
- Last Value – The last recorded value of the variable. Note that if the variable has never reported a value, this will be blank.
- Last Updated – A timestamp for the value. Again, it will be blank if no value has been recorded.
Note the value in the button_state and press the pushbutton. The value of the cloud variable should now go HIGH. Release the button, and it should go LOW.

Examining the stats of your cloud variables is an excellent troubleshooting tool; keep it in mind if one of your Arduino IoT Cloud projects doesn’t work as you expect it to.
Updating the Dashboard
Finally, we should put a widget on our dashboard to interact with the button_state variable. The LED widget is a good choice; this is a general-purpose indicator that can be set to red, green, or bi-color.
Go to your dashboard and put it into Edit mode so you can modify it.
Open the Widgets drop-down and find the LED. Open it and attach the button_state cloud variable to it. Save and position the widget.

Now, try the push button. It should toggle the LED.
Adding a Second Device (ESP32)
At this point, congratulations are due. You have added your Uno R4 WiFi board to the cloud as a Device, created your first Thing, written a sketch to interact with some peripherals, and created a Dashboard for your project.
Now, we will expand upon our IoT network by adding another Device. A non-Arduino board this time.
Grab an ESP32 board. I used an ESP32 Dev Kit, but any ESP32 board listed on the Arduino IoT Cloud will do. You’ll also need a few components:
- A 10K or greater linear-taper potentiometer.
- An LED. I used a red one, but you can be creative and use a different color.
- A 120-ohm dropping resistor for the LED. Any value near that will work.
Wire up your ESP32 as follows:

ESP32 Add Device
Now that you have your ESP32 wired up, we can add it to the Arduino IoT Cloud. We have already done that with the Arduino Uno R4 WiFi board, and the process for adding an ESP32 is nearly identical.
Go to Devices and add a new device. Select “Third Party Device” instead of the Arduino board.

On the next screen, select ESP32. Then select a board that matches or is similar to the one you are using.
The next screens are familiar; you can name your board and download a PDF with the Security Key. Make sure you save that information in a safe place.

After that, you are done; there is no firmware to add to a third-party board, so the process is quick.
ESP32 Cloud Variables
Create a Thing to associate with your ESP32 device. Connect it to your network using the Security Key.

Now add the following cloud variables:
- led_control – Boolean, Read & Write, Update on Change
- pot_value – Integer, Read Only, Update on Change
The led_control variable is a boolean that is HIGH when the LED is on. The pot_value is an integer representing the value of the 10K potentiometer, from 0 to 4095.
ESP32 Potentiometer Code
After you create the Thing, a sketch will be generated for you. We will add more code to get the potentiometer value and pass it to the cloud variable pot_value.
In the declarations section (before Setup) add code to define the pin the potentiometer is connected to:
|
1 2 3 |
// Define pin for potentiometer const int potPin = 34; |
Now add this code to the Loop to get the potentiometer value and update the cloud variable:
|
1 2 3 |
// Get Potentiometer Value pot_value = analogRead(potPin); |
And that’s it! The board will update the cloud variable every time the Loop is run.
Upload the code to the ESP32 and check out the pot_value cloud variable value. It should change when you move the potentiometer.

Add ESP32 Potentiometer to Dashboard
So now that we have a cloud variable that tracks our potentiometer, we can add a display on the dashboard for it.
A good widget for this is the Gauge. Select it from the widgets and connect it to the pot_value cloud variable in your ESP32 Thing.
Before you close the properties for the gauge, edit the range so it is 0 to 4095. This is the output of the 12-bit A/D converter in the ESP32.

Now watch the gauge while you rotate the potentiometer shaft. You should see it track the movement with the value displayed.

OTA Update
Before we move on, we need to unplug our ESP32 from the computer. Disconnect the USB and use a power bank or adapter to power the ESP32. Verify it is back on the cloud by moving the potentiometer and observing the dashboard.

Now go into your cloud editor with the same sketch ESP32 we have been working on. On the top corner (beside the “upload arrow” you will see a board icon. Next to that, you’ll see the board status. It should say Over-The-Air. This means OTA updating is now available for this board.

With OTA updating you can update the sketch without connecting the board to your USB port. Any board on the IoT Cloud can be updated in place. Very handy when you have boards deployed everywhere!
Now, let’s edit the code to include the LED. When we are done we can update Over the Air!
LED Code Updates
The code for the LED is pretty simple. First, in the declarations, we define the pin we are connected to:
|
1 2 3 |
// Define pin for LED const int ledPin = 4; |
In Setup, we set the pin as an Output.
|
1 |
pinMode(ledPin, OUTPUT); |
Finally, we modify the callback function that the Arduino IoT Cloud wrote for us to update teh LED based upon the value of cloud variable led_control:
|
1 2 3 |
// Drive LED with cloud variable digitalWrite(ledPin,led_control); |
Now do an update, just as you would with a connected board. The procedure is identical, and after verifying your sketch, the OTA update will begin. It goes pretty quickly.

When the update is done, you’ll get a message saying it was completed successfully.
LED Dashboard Modifications
Return to your dashboard, put it in edit mode, and look for a push button wizard. Attach it to your led_control cloud variable. Then, test it out.
As you probably have come to expect by now, the push button wizard can control the LED on the ESP32.
But we also have another push button, the physical one attached to the Uno. How could we get it to control the LED on the ESP32?
Device-to-Device
Device-to-device communication is a great feature you can implement in the Arduino IoT Cloud. You do it using Synchronized Cloud Variables.
You can synchronize variables from different Things, and you can synchronize more than one variable. The only requirement is that the variables are of the same type. So don’t try to synchronize a boolean with an integer; for example, the IoT Cloud won’t even let you.
In our case, we can synchronize the two booleans we are working with, as they represent the same thing – HIGH is “on,” and “LOW” is “off.” Although we also have two integers and could synchronize them, they have different number ranges. Consider thighs like this when you synchronize variables.
Let’s synchronize our two booleans, which are:
- button_state – From the Uno R4 WiFi Thing
- led_control – From the ESP32 Thing
You can perform the synchronization operation from any Thing control panel that contains one of the variables. I will illustrate it with the Uno R4 Thing. Open it, and open the properties of the button_state variable.

Note the like to “Sync with other Things”. Click on it.
A panel will open, with all of your Things. As you navigate through them you will see the cloud variables (if any) that can sync with your variable. Note that in this case, only booleans will be visible.
Navigate to the ESP32 Thing and select the led_control variable.

Save the changes and you are done. It’s that easy!
Now try it out. Press the switch on the Arduino Uno R4 WiFi board. You should see the LED on the ESP32 board respond. You should also note that all the dashboard widgets attached to both variables still work as well.

Using Triggers
The final concept we will examine is Triggers. This is a relatively new addition to the Arduino IoT Cloud.
As we already discussed, Triggers allow you to send a push notification and/ or and email in response to an event. As of this writing (February 2024), Triggers only work with Boolean and String Cloud Variables!

Let’s set up a trigger using our push button boolean. When we press the button, the Trigger will fire. I will have it send a push notification, but you can elect to send an email isolated if you prefer.

Now that we know what we want to do let’s see how to accomplish it!
Make a New Trigger
In the cloud console, go to the Triggers screen and click the green button to create a new trigger. A new page will open, where you will build your Trigger.

On the right of the screen is a Source & Condition section. Click the Cloud Variable button and select the button_state cloud variable from the Uno project. Click Link Variable when it is selected.


Now, you will see your trigger logic build. We will make a simple trigger, so in Actions, select Send Push Notification.

The To field in the message should have your account name, indicating it is going to the IoT Cloud Remote App on your phone or tablet (make sure you have that installed to test triggers). Fill in a message title and a bit of text in the body.
When you are finished, click the big green Done button on the button right.
And now you have a trigger. One last step is to go to the Trigger page in the cloud console and verify it is enabled.

Now, test it out! Make sure you have the IoT Cloud Remote app on your phone or tablet running, and press the button. Within a few seconds, you should be alerted that the button was pressed!
I’m sure you can dream up many great uses for triggers!
Conclusion
The Arduino IoT Cloud has undoubtedly expanded since we last looked at it. And there is more to come! In future installments, we will work with Python and MicroPython and connect our Amazon devices to the cloud along with our microcontrollers.
I hope you enjoyed this very detailed look at the Arduino IoT Cloud.


Can the Arduino IoT cloud be run on the local machine (r.pi or pc)?