


IR Remote controls are everywhere these days, you probably have several of them around your home to control your video and audio equipment as well as air conditioners, fans and even light bulbs.
These devices can also be used with your Arduino projects and in this article I’ll show you how you can decode the outputs from your remotes, repurpose them to control additional devices and even build your own custom remote controls.
Introduction
It’s hard to imagine that there was a time when you actually had to get out of your chair to change channel and adjust volume on your television. Every television and most other audio and video equipment come equipped with a remote control that allows you to be a true “couch potato”, controlling your world from the comfort of your favorite chair.

The IR remote control has changed how we interact with our appliances, for better or worse.
Chances are you have a large collection of these devices, some may even be left over from equipment you no longer own or use. Most of the ones you do make use of have several buttons that serve you no purpose as they were made to integrate with additional equipment that you don’t even own.
Time to put those unused buttons and controllers to good use! All you will need are a few very inexpensive parts and an Arduino to decode the outputs from these little electronic gems and put them to work in your own custom designs.
Or maybe you’d like to build your own custom control, one that controls all your device or a simplified one to replace that 40-button monster you fumble with daily.
In this article we will examine how IR remotes work and how you can decode their signals with an Arduino. We will also look at how you can use the Arduino as a remote control itself, emulating the signals that the original controller emitted.
Finally we will see how you can use very inexpensive remote controls in your own custom projects. Let’s get started!
How IR Remote Controls Work
Before we start hacking our remote controls it would be a good idea to discuss how they work.
IR remote controls, as the name would imply, make use of pulses of infrared light to send signals to a receiving device such as a television or sound system. Each button on the remote control sends out a unique pattern of pulses which are decoded by the receiver so that the appropriate action (i.e. raise the volume, change channels) can be taken.
IR remotes make use of IR LED’s which are very inexpensive, in fact some of the very first LED’s manufactured in the 1970’s were infrared as it was actually easier (and cheaper) to make IR light with an LED than it was to output visible light.

The infrared part of the light spectrum is just below the visible spectrum, the name “infrared” actually means “below red” which is where they sit on a spectrum chart. This is the opposite of ultraviolet or UV light which is just above the visible spectrum, “ultraviolet” meaning “above violet”.
Infrared light is perfectly safe to work with, you can stare into a working IR remotes LED without any fear of damaging your eyes. In fact you are exposed to infrared light every day, often without being aware of it.
Preventing Interference
Sunlight and the interior lighting in your home have infrared components along with their visible components, and this abundance if infrared light can make it difficult for IR remotes to function as it interferes with them. To resolve this problem IR remotes don’t just pulse their LED’s on and off, instead they modulate them in the same fashion as analog radio modulates a carrier wave to send a signal.
Most IR remotes use a modulation frequency of 38 kHz although a few use different frequencies. The IR receivers are designed to look for this modulated infrared light and to ignore the rest, effectively filtering out the sea of infrared ambience flooding the room.
Infrared light covers a broad range of the spectrum, from 700 Nm to 1 mm. Most IR LED’s used in remote controls operate at 850 Nm to 940 Nm range so most receivers are tuned to receive light within this range. This is another way that they prevent interference from sunlight and other infrared sources.
Manufacturer Codes
As I mentioned earlier different manufacturers use different codes for their remote controls, in addition there are different codes for different devices made by the same manufacturer. Codes are also shared between manufacturers so there is a possibility that two remotes may conflict with one another.
A great resource for finding manufacturer codes is the IRDB, which is an online database of IR codes for virtually every remote control device ever made. I’m also about to show you how you can use an Arduino to determine which codes your remotes are using so keep on reading!
Working with IR Remote Controls
Working with IR remotes is pretty simple. You’ll need an IR sensor to pick up signals and an IR LED to send them.
IR Receivers
Receiving IR codes requires a special infrared sensor, and there are many inexpensive ones available. One common device is the 1838T infrared receiver, a tiny 3-pin sensor that is often included with those inexpensive remote control kits that you can get on eBay of Amazon.

You can purchase this sensor by itself or mounted on a small module board. The latter usually will accept a 3-pin Dupont connector which makes it easy to use in your project. Either way the three pins on the sensor or module have the following functions:
- Ground. Labeled GND or G on most modules.
- 5 Volts power. Labeled VCC or R on most modules
- Signal Out. Labelled S or Y on most modules
Using an IR receiver with an Arduino is as simple as supplying 5 volts and Ground from the Arduino and connecting the module or sensors output to one of the Arduino digital I/O pins. We will do exactly that in our first few experiments.
IR Transmitters
The Transmitting part of a remote control is basically an IR LED. An IR LED is used exactly like a visible LED, you supply current with the proper polarity and limit it with a current limiting resistor.
The IR LED is packaged in the same package as a visible LED. The Anode (positive) lead is the longer of the two leads. The Cathode (negative) lead is the shorter one. In case your leads are both the same length the Cathode side of the LED is flat.
As with any LED light is emitted from the top of an IR LED. Keep that in mind when you are doing the transmitter experiments that follow, infrared light is very directional so you will want to aim your LED at the receiver for best performance (although, as most people are aware from using IR remotes, the light can be “bounced” of of white and reflective surfaces).
“Seeing” Infrared Light
One problem you can run into when you’re working with IR remote control projects is that your human eye is incapable of seeing the IR light. If your project doesn’t work it’s often hard to determine if the problem is with the transmitter or receiver.
The way to get around this is to use a video camera that is capable of seeing and displaying infrared light. Fortunately there are plentiful and you probably have one already – in your phone or tablet.
While dedicated cameras (such as a DSLR) have IR filters they aren’t as common on phone and tablet cameras, as a result these cameras are sensitive in the IR range as well as in the visible range of light.
It’s pretty easy to see if your phone or tablet is capable of “seeing” IR. Just take a remote control that you know to be working and aim it at the lens of your camera while you view the screen. If all goes well you will see the IR LED flash as you press the keys on your remote.
Once you have established that your phone or tablet can see infrared you have a valuable troubleshooting tool that you can use if things don’t work out exactly as you planned them.
Decoding IR Remote Controls
Time for our first experiment! You’ll need an Arduino, I used an Uno but other Arduino’s will work as well. Don’t use an ATTiny85 however as the library we will make use of isn’t fully compatible with it.
You’ll also need an IR Sensor. I’m using one that is on a module but you could also use an 1838T sensor by itself and it will work just fine.
Before we begin you’ll need to install a new library into your Arduino IDE
The IR Remote Library
All of the experiments we will be performing make use of an amazing library caller “IRRemote”. The library was written and is maintained by a fellow named Ken Shirriff with contributions by Paul Stoffregen and the Arduino community should be indebted to both of them for all of the hard work that they put into it.
While you can get the Arduino IR Remote Library on GitHub it is also available (and easier to install) directly from the Library Manager in your Arduino IDE. Open the Library Manager and search for “IR Remote”. Don’t be fooled by some of the other libraries that have a similar name (including the Robot IR Remote that is already installed in your IDE), look for “IR Remote by Shirriff” – that’s the one you need. Click the “more info” link to get the library info and then click the button to install it into your IDE.
The beauty of this library is that it can be used for both receiving and transmitting IR Remote Control codes. Once you have it installed you’re ready to start working with remote controls with your Arduino.
Ken has an excellent blog that goes into great detail about using the library, I urge you to pay it a visit.
Getting Remote HEX Codes
To start off we will build a very simple IR receiver using an IR sensor and an Arduino. Here is how we will hook it up:
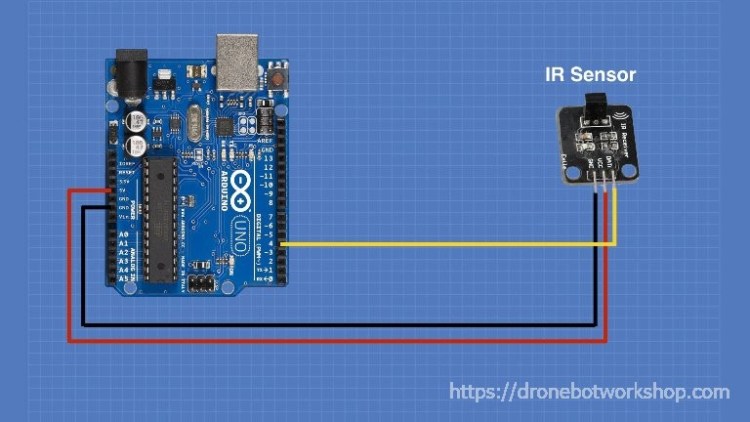
As you can see the hookup is pretty simple. We use the 5 Volt and Ground outputs from the Arduino to connect to the sensors VCC (G) and GND (R) pins respectively. Then we connect Arduino pin 4 to the sensors Signal (Y) pin to collect information from it.
The actual digital I/O pin we’re using on the Arduino isn’t important so you could use a different one if you wish, just be sure to modify the sketch if you do.
In our first sketch we will capture the unique codes sent when each button the remote is pressed. We’ll use the serial monitor to display them.
|
1 2 3 4 5 6 7 8 9 10 11 12 13 14 15 16 17 18 19 20 21 22 23 24 25 26 27 28 29 30 31 32 33 34 35 |
/* IR Receiver Demonstration 1 IR-Rcv-Demo1.ino Demonstrates IR codes with IR Receiver Displays results on Serial Monitor DroneBot Workshop 2017 http://dronebotworkshop.com */ // Include IR Remote Library by Ken Shirriff #include <IRremote.h> // Define sensor pin const int RECV_PIN = 4; // Define IR Receiver and Results Objects IRrecv irrecv(RECV_PIN); decode_results results; void setup(){ // Serial Monitor @ 9600 baud Serial.begin(9600); // Enable the IR Receiver irrecv.enableIRIn(); } void loop(){ if (irrecv.decode(&results)){ // Print Code in HEX Serial.println(results.value, HEX); irrecv.resume(); } } |
We start the sketch by including the IRRemote library. Next we define a pin for our IR Receiver, after which we create two objects for the IR Receiver and the Results. We then move on to the Setup routine.
We’ll be using a serial monitor to display our results so we setup the connection, this example uses 9600 baud but any speed will do – just be sure to set your Serial Monitor window to match the speed you have chosen. We also enable the IR Receiver in the setup routine.
Finally the loop. We use an If statement to verify that we have indeed received something and have a valid result. We then print the result value in hexadecimal, which is the standard way of displaying IR receiver codes. Finally we resume listening and repeat the loop.
Compile the code and upload it to your Arduino. Next open your serial monitor. Now grab an IR Remote control (just about any one will do) and aim it at the IR receiver module. If everything is working you’ll see the codes displayed in the serial monitor.
You may note a number of codes that read “FFFFFFFF”. These are “repeat codes” which are used with most remote controls to repeat the last key pressed, they are generated when you hold a key down. We will see how to deal with these a bit later.
Determining Manufacturer Codes
As I mentioned previously there are a number of groups of IR codes used by various manufacturers. For the experiments where we emulate IR Remote controls we’ll need to know which manufacturer codes to use.
The next sketch expands upon the last one to include a display of the Manufacturer Code along with the HEX codes. The wiring for this experiment is identical to the previous experiment.
|
1 2 3 4 5 6 7 8 9 10 11 12 13 14 15 16 17 18 19 20 21 22 23 24 25 26 27 28 29 30 31 32 33 34 35 36 37 38 39 40 41 42 43 44 45 46 47 48 49 50 51 52 53 54 55 56 57 58 59 60 61 62 63 64 65 66 67 68 69 70 71 72 73 74 75 76 77 78 79 80 81 82 83 |
/* IR Receiver Demonstration 2 IR-Rcv-Demo2.ino Determine IR codes manufacturer type with IR Receiver Displays results on Serial Monitor DroneBot Workshop 2017 http://dronebotworkshop.com */ // Include IR Remote Library by Ken Shirriff #include <IRremote.h> // Define sensor pin const int RECV_PIN = 4; // Define IR Receiver and Results Objects IRrecv irrecv(RECV_PIN); decode_results results; void setup(){ // Serial Monitor @ 9600 baud Serial.begin(9600); // Enable the IR Receiver irrecv.enableIRIn(); } void loop(){ if (irrecv.decode(&results)){ Serial.println(results.value, HEX); switch (results.decode_type){ case NEC: Serial.println("NEC"); break; case SONY: Serial.println("SONY"); break; case RC5: Serial.println("RC5"); break; case RC6: Serial.println("RC6"); break; case DISH: Serial.println("DISH"); break; case SHARP: Serial.println("SHARP"); break; case JVC: Serial.println("JVC"); break; case SANYO: Serial.println("SANYO"); break; case MITSUBISHI: Serial.println("MITSUBISHI"); break; case SAMSUNG: Serial.println("SAMSUNG"); break; case LG: Serial.println("LG"); break; case WHYNTER: Serial.println("WHYNTER"); break; case AIWA_RC_T501: Serial.println("AIWA_RC_T501"); break; case PANASONIC: Serial.println("PANASONIC"); break; case DENON: Serial.println("DENON"); break; default: case UNKNOWN: Serial.println("UNKNOWN"); break; } irrecv.resume(); } } |
The sketch is identical to the first one until we get to the loop.
The loop starts as before with an If statement to verify that we have indeed received a valid bit of data. Once again we display the HEX code for the data in the serial monitor.
We then go on to evaluate the “decode_type”, which is related to the manufacturer code received. This is done in a Case statement, for each case we print out the manufacturer in the serial monitor and then break out of the case statement. If we can’t determine the manufacturer we just print “Unknown”.
Again we finish and repeat the loop. The results on the serial monitor will now display both the HEX value and Manufacturer name for each code received.
You might want to make note of some of this information for the next experiment where we will put our knowledge to something more practical – repurposing unused buttons on our remote controls.
Repurposing Remote Controls
If you’re anything like me you likely have an abundance of remote controls around your home, maybe even several in the same room. Chances are that some of them have a LOT of buttons, including buttons that are of no use to you as they work with additional equipment that you don’t even own.
The example I use in the video is for an RCA television set that I own. The remote for this TV has buttons for a DVD or Blu-Ray player that I don’t own. These buttons are useless to me so I thought I’d put them to work controlling other things. With an Arduino and the IR Remote library it’s pretty easy to do that.
Before I started coding I needed to get both the HEX code for each of the buttons I was interested in. In my example I chose to use two buttons, a Red one with a HEX value of FECA35 and a Yellow one whose value turned out to be FE8A75.
Of course if you choose to perform the same experiment you’ll be using one of your own remote controls so you’ll need to use one of the previous sketches to determine and record the HEX codes for the buttons you are interested in.
To demo this I hooked up the Arduino with the IR Receiver module and a couple of LED’s, each LED also has a dropping resistor (I used 330 ohms but anything around that value will work fine).

Armed with the two HEX codes I wrote the following sketch. It detects the two aforementioned buttons and does the following:
- When the REd button is pressed the Red LED in my experiment will flash on for two seconds and then turn off.
- When the YELLOW button is pressed the Yellow LED will turn on and stay on. The next time that the YELLOW button is pressed the Yellow LED will turn off. In other words it’s a toggle switch.
So let’s take a look at the sketch:
|
1 2 3 4 5 6 7 8 9 10 11 12 13 14 15 16 17 18 19 20 21 22 23 24 25 26 27 28 29 30 31 32 33 34 35 36 37 38 39 40 41 42 43 44 45 46 47 48 49 50 51 52 53 54 55 56 57 58 59 60 61 62 63 64 |
/* IR Receiver Demonstration 3 IR-Rcv-Demo3.ino Control LED's using Unused IR Remote keys DroneBot Workshop 2017 http://dronebotworkshop.com */ // Include IR Remote Library by Ken Shirriff #include <IRremote.h> // Define sensor pin const int RECV_PIN = 4; // Define LED pin constants const int redPin = 8; const int yellowPin = 7; // Define integer to remember toggle state int togglestate = 0; // Define IR Receiver and Results Objects IRrecv irrecv(RECV_PIN); decode_results results; void setup(){ // Enable the IR Receiver irrecv.enableIRIn(); // Set LED pins as Outputs pinMode(redPin, OUTPUT); pinMode(yellowPin, OUTPUT); } void loop(){ if (irrecv.decode(&results)){ switch(results.value){ case 0xFECA35: //Red Keypad Button // Turn on LED for 2 Seconds digitalWrite(redPin, HIGH); delay(2000); digitalWrite(redPin, LOW); break; case 0xFE8A75: //Yellow Keypad Button // Toggle LED On or Off if(togglestate==0){ digitalWrite(yellowPin, HIGH); togglestate=1; } else { digitalWrite(yellowPin, LOW); togglestate=0; } break; } irrecv.resume(); } } |
Again we start by including the IR Remote library and defining a pin for the IR Receiver module. We also define a couple of pins that we will connect our LED’s to the Arduino with. None of this is cast in stone so you may use other pins if you like, just be sure to reflect your changes in the sketch.
Next we define a variable I called “togglestate”, this is used to represent the last state (on or off) of the Yellow LED which you’ll recall is being used as a toggle.
We then move on to setup the Receiver and Results objects as we did in the previous sketches.
In the setup loop we no longer define a serial port connection as there is no serial monitor being used. We just enable the IR Receiver and use the Arduino pinmode function to set the two LED pins as outputs.
On to the loop! Again we use an If statement to check to see we have a valid code received and then we evaluate the results with a couple of case statements.
In the first case statement we look for the code “FECA35” which means that the Red button has been pressed. If it evaluates then we turn on the Red LED, wait two seconds and then turn it off. We then break out of the case statement.
The second case statement looks for the code “FE8A75”, meaning that the Yellow button has been pressed. In this case we want to toggle the Yellow LED so we use an If statement to evaluate the current value of “togglestate”. If “togglestate” is zero the the LED was off so we turn it on and then set “togglestate” to 1. If the “togglestate” is already 1 then we turn off the yellow LED and set “togglestate” to zero. We then exploit the case statement and wait until another key press is detected.
In “real life” this circuit and code can have many practical applications, especially if you replace the LED’s with relays and use them to control devices. If you decide to do that be VERY CAREFUL as you’ll likely be working with AC line voltage. Don’t experiment directly with high voltage, use all the proper wiring precautions and test everything with a multimeter before you hook up any high voltage. If you are not comfortable working with line voltage then simply don’t do it!
Emulating IR Remote Controls
So far we have been experimenting with receiving and decoding remote control signals. Now let’s move on to transmitting them.
The wonderful IR Remote library also has facilities to transmit IR codes using an IR LED. An IR LED is used pretty well in the same way as a visible light LED except of course it transmits light in the infrared band so you can’t directly see it. Remember that you can use the camera in your phone or tablet if you need to “see” the IR light.
IR LEDs are quite inexpensive so stock up on a few the next time you place an order for parts on eBay or visit your local electronics store.
In this experiment I’ll use an IR LED with an Arduino and a push button to turn on (and off) my television. While this is a simple application you could extend it to control several different devices with the push of a button. You could also design a custom or simplified remote control to make it easier to control all of the home entertainment equipment you have piled up in your living room or bedroom.
Manufacturers Codes and Bits
Before we begin we’ll need to use the second experiment to determine both the HEX code and Manufacturers code for the device(s) we want to control. Once we do that we will need another bit of information – the number of bits to send with each code. This differs between manufacturers and, as it turns out, isn’t the easiest information to obtain.
I’ve summarized a few of the more popular codes here in a chart, along with links to get more details (if I have them). There is also very detailed information in some of the links in the Resource Box at the end of this article. If you find info that I’m missing here I’d appreciate you make a comment to share it with others.
| Manufacturer Code | Number of Bits | More Info |
| NEC | 32 Bits | NEC – More Info |
| Sony | 12 or 20 Bits | Sony – More Info |
| RC5 | 12 | RC5 -More Info |
| RC6 | 20 | RC6 -More Info |
| Denon | 15 Bits | |
| Motorola | 9 Bits | |
| Samsung | 20 Bits |
Additionally the Sony and RC6 codes are sent three times for each button press while most of the others are only sent once.
Assuming you can find the information for the button(s) you need to emulate we can move on to building our circuit and coding for it.
Arduino Remote Emulator
In my simple experiment I’m going to emulate the Power button for the same RCA TV remote control I used earlier. I have determined that this button sends a code of “FEA857” and uses an NEC code that has a 32 bit bitstream.
One idiosyncrasy of the IR Remote library is that in order to send IR codes your IR LED needs to be on Pin 3 of the Arduino. Unlike the other demos this is cast in stone and can’t be changed, this is because Pin 3 is associated with an internal timer within the Arduino which the library uses to transmit codes.
Aside from the IR LED (and its associated 150 ohm dropping resistor) the circuit also uses a push button with a 10k pulldown resistor. The wiring is as follows:

Now that we have hooked up the circuit let’s take a look at the sketch that is used to send our power code to the television.
|
1 2 3 4 5 6 7 8 9 10 11 12 13 14 15 16 17 18 19 20 21 22 23 24 25 26 27 28 29 30 31 32 33 34 35 36 37 38 39 40 41 42 |
/* IR Transmitter Demonstration 1 IR-Xmit-Demo1.ino Control TV using IR Library IR LED must use Pin #3 DroneBot Workshop 2017 http://dronebotworkshop.com */ // Include IR Remote Library by Ken Shirriff #include <IRremote.h> // Define switch pin const int switchPin = 7; // Define a variable for the button state int buttonState = 0; // Create IR Send Object IRsend irsend; void setup() { // Set Switch pin as Input pinMode(switchPin, INPUT); } void loop() { // Set button state depending upon switch position buttonState = digitalRead(switchPin); // If button is pressed send power code command if (buttonState == HIGH) { irsend.sendNEC(0xFEA857, 32); // TV power code } // Add a small delay before repeating delay(200); } |
As always we start by including the versatile IR Remote library. We also define the pin used for the push button, as well as a variable “buttonstate” that holds the value (on or off) of the push button.
Next we’ll create an IR Send object as this time we’ll be using the library to send IR codes instead of receiving them
The Setup routine is pretty simple as all we are doing is defining the push button pin as an input.
The loop is also pretty simple. We check the button state using the Arduino “digitalRead” function and assign the state to the ‘buttonstate” variable. Then we use an If statement to determine if the button has been pressed.
If the button was pressed we use the libraries “irsend” function to transmit our code. The “irsend” function uses a “”sendNEC” property as our code is in NEC format (there is also a “sendSONY, sendRC6 and other properties for the other types of remote codes). The “irsend” function uses the code we wish to send (“FEA857” in my case) and the number of bits (32 in my case) as parameters.
All that is left is to add a tiny delay to debounce the push button. And it works, I can control my television with the push of a button – imagine that!
An IR Remote for your Arduino Projects
So far we have experimented with decoding and emulating the remote controls we have around the home. It’s now time to put an IR remote control to work in our own Arduino project.
There are a number of inexpensive remote control kits you can pick up on eBay and Amazon. Each one comes with a remote as well as an IR receiver module and an IR LED. They are all very inexpensive and ideal for creating our own remote control for our Arduino projects.
Using these remotes is exactly the same as using the commercial IR remotes we have been experimenting with, and you may use all of the previous sketches and wiring diagrams to put them to work.
Using the Repeat Function
One thing we have only touched on is the “repeat” function. As you may recall most remote controls (including the ones you get on eBay and Amazon) transmit a code of “FFFFFFFF” whenever a button is held down. This code indicates that the receiver should repeat the function until the button is released.
You have likely seen this in action on your own equipment as this function is used for controls like volume, brightness and contrast on most televisions.
Let’s put the repeat function to work in our own Arduino project!
In this project I’m going to control a small servo motor with one of those inexpensive custom remote controls. I have decided to only use three buttons for this demonstration, of course you’re free to expand upon this and use all of them if you wish.
My project will control the servo motor as follows:
- The servo will start in the center position.
- Pressing the Left (<) button once will move the servo two degrees to the left. Holding it down will make it continuously move left until it reaches the end of travel.
- Pressing the Right (>) button once will move the servo right by two degrees. Holding it down will make it continuously move right until it reaches the end of travel.
- Pressing the OK button will center the servo.
To achieve this I wired up my circuit as follows:

Note that I used a separate 5-volt power supply for the servo motor instead of using the Arduino 5-volt output. I found that the servo put too much electrical noise onto the 5-volt line and this interfered with the IR Sensor. I tried putting a 100uf capacitor across the power supply line to attempt to reduce the noise, it did but it still did not eliminate it completely. So I used my 5-volt bench supply to drive the servo.
If you wish you can also use a 6-volt battery to power the servo as most small servos are rated to accept 6-volts. Just don’t use the Arduino supply!
Now onto the sketch that makes the magic happen:
|
1 2 3 4 5 6 7 8 9 10 11 12 13 14 15 16 17 18 19 20 21 22 23 24 25 26 27 28 29 30 31 32 33 34 35 36 37 38 39 40 41 42 43 44 45 46 47 48 49 50 51 52 53 54 55 56 57 58 59 60 61 62 63 64 65 66 67 68 69 70 71 72 73 74 75 76 77 78 79 80 81 82 83 84 85 86 87 88 89 90 91 92 93 94 95 96 |
/* IR Receiver Demonstration 4 IR-Rcv-Demo4.ino Demonstrates IR codes with Custom Remote and IR Receiver Makes use of Repeat function DroneBot Workshop 2017 http://dronebotworkshop.com */ // Include IR Remote Library by Ken Shirriff #include <IRremote.h> // Include Arduino Servo Library #include <Servo.h> // Define Sensor Pin const int RECV_PIN = 4; // Define Servo Pin const int SERVO_PIN = 6; // Define Variable for Servo position // Start at 90 Degrees (Center position) int pos = 90; // Define variable to store last code received unsigned long lastCode; // Define IR Receiver and Results Objects IRrecv irrecv(RECV_PIN); decode_results results; // Create servo object Servo myservo; void setup() { // Start the receiver irrecv.enableIRIn(); // Attach the servo myservo.attach(SERVO_PIN); // Start with Servo in Center myservo.write(pos); } void loop() { if(irrecv.decode(&results)) //this checks to see if a code has been received { if(results.value == 0xFFFFFFFF) { // If Repeat then use last code received results.value = lastCode; } if(results.value == 0xFF22DD) { // Left Button Pressed lastCode = results.value; // Move left 2 degrees pos += 2; // Prevent position above 180 if(pos > 180){pos = 180;} myservo.write(pos); } if(results.value == 0xFFC23D) { // Right Button Pressed lastCode = results.value; // Move Right 2 degrees pos -= 2; // Prevent position below 0 if(pos < 0){pos = 0;} myservo.write(pos); } if(results.value == 0xFF02FD) { // Center Button Pressed lastCode = results.value; // Move to Center pos = 90; myservo.write(pos); } // Add delay to prevent false readings delay(30); //receive the next value irrecv.resume(); } } |
Again we begin by including the IR Remote library. We also include the Arduino Servo Library which is already included with the Arduino IDE.
Next we define constants representing the pins that our IR Sensor and Servo are connected to. There is also a variable called “pos” defined to hold the value (in degrees) that our servo is positioned. As we want to start the servo in its center position we initialize this with a value of 90. Finally we define a long variable called “lastcode” that holds the most recent key code value, we will use this with the repeat function to “remember” what key we are supposed to be repeating.
Next we create object for the IR Receiver and the Results, as well as an object representing the servo.
In the Setup routine we enable the IR Receiver, attach the servo to the pin we defined earlier and move the servo to the center position.
Now the loop. As before we will check to see if we have a valid result code from the IR Receiver and assuming we do we check to see what the code was using a series of If statements.
First we check to see if we have received the repeat code, FFFFFFFF. If we do we replace the value of the result with the previously received code, held in the “lastcode” variable. It’s very important that we execute this If statement first.
After that we go through a series of If statements that check for our button presses. If we find the Left button code has been received then we add 2 to the value of “pos” and move the servo to that position. We also check to be sure that “pos” does not exceed 180 as that’s the maximum value for our servo.
Similarly we check to see if the Right button was pressed, if it was then we subtract 2 from the value of pos and move the servo accordingly. Again we test to ensure that the value of “pos” doesn’t go below zero.
Finally we check to see if the OK button was pressed. If it was we reset the value of “pos” to 90, which will center the servo.
A small time delay was added to the end of the code to prevent false readings, you may experiment with the value if you wish.
After coding and compiling we upload the code to the Arduino and test it out. Check out the video to see it working.
Conclusion
As you can see by using the IR Remote library and an Arduino we can really do a lot with IR Remote controls. We can repurpose existing controls, build custom controls and design projects with our own remotes.
I’d really be interested to hear what you manage to build using this information. Please share any of your designs along with any questions you might have in the comments below.
Now go out there and control the world!
Parts List
Here are some components that you might need to complete the experiments in this article. Please note that some of these links may be affiliate links, and the DroneBot Workshop may receive a commission on your purchases. This does not increase the cost to you and is a method of supporting this ad-free website.
COMING SOON!
Resources
Arduino Sketches All of the code from the experiments in this article.
Ken Shirrif’s Blog The creator of the IRRemote Library for Arduino has excellent information on his personal blog.
ArduinoInfo IR Remote Page Lots of useful information about IR Remote sensors and remotes.
IR Communication – Getting Started Some great information from the good folks at Sparkfun.
Using IR Library on Arduino Adafruit has some great information on their blog.
1838T Spec Sheets Specifications for the 1838T Infrared Receiver
IR Remote Library The IR Remote Library on GitHub.


Hallo Droneworkshop I’m Brian from Limburg the Netherlands.
I have loved experimenting with the remote on the Arduino and I was so encious to controll those two LEDs. After copying your code, I got an error message:
‘irrecv’ has no type of name!
on line command 17 I’ve discovered:
const int redPin = 8; irrecv.resume(); . What does the “irrecv.resume();” do in that line? After copying and compiling again, the same error message appeared again, caused by irrecv.resume(), so I’ve put slashes in front of that command and the program worked.
Greetings.
B. Mc Carthy
“If the button was pressed we use the libraries “irsend” function to transmit our code. The “irsend” function uses a “”sendNEC” property as our code is in NEC format (there is also a “sendSONY, sendRC6 and other properties for the other types of remote codes).”
sendSONY is actually “sendSony”.
easy mistake to make as they have use random formatting 🙁
Oops! Thanks for pointing that one out Bryan!
hello , i think i have the same problem in fact my code type is an unkown and it doesn¨t work with the irsend , it just works with NEC format 🙁 any help plzzz !!
I have similar problem… mine is recorded as unkown or sanyo.. have you discovered yet?
Hello I really enjoy your tutorials and hope someone can help me with my code as i cannot seem to find why its not working probably as I’m a noob.
Here is my code
https://pastebin.com/BzEXYbND
hi, i want to say that i followed your video untill the end and i found it very interesting. you explain concepts narrowly. now, i have a quetsion, what model is your tv? i have an anonymous tv which remote is the same as yours: i would like to pair my tv with a universal remote, but i cant’ t find the model. i detected the code with my arduino and it is the same of your remote. please, i need help. D:
I just checked the television, it’s an RCA model RLEDV2488A. Hope that helps, best of luck with with your project!
Hello Bill; Thank you very much for the wonderfully produced videos, I find them clear, concise and very helpful. I am a mechanical engineer and have worked in orthopedics for 40 years. I have my own consulting firm for the last 25 years and have worked on many interesting projects of all types. I have the highest level ham radio classification so I am somewhat familiar with electronics, but being 66 years old these microprocessors have taken me some time to absorb. You have made it enjoyably successful for me, thank you very much and keep up the great work.… Read more »
HEY , I M HOBBYIST ABOUT AVR/ ARDUINO , I MADE MANY PROJECTS REGARDING INTERFACE WITH IR REMOTE (NEC) BUT MINE QUESTION ABOUT ITS SENSITIVITY. I NOTICED ONE THING THAT BY USING TSOP1838 THE MAXIMUM RANGE FOR OPERATION IS APROX 5-6 FEET WHILE TV REMOTE DOES WORK FROM EVERYWHERE IN ROOM…TV SETS ARE VERY SENSITIVE ABOUT COMMANDS
WHAT MAKE IT MUCH SENSITIVE & HOW THEY CAPTURE EASILY COMMAND FROM REMOTE.
IS IT BECAUSE OF REMOTE QUALITY OR BECAUSE OF TV SET QUALITY.
Hi there, complete newby to Arduino and this is one of the most useful tutorials i have come across! Just a quick question please, will a 850nm IR LED do the job as well? This is the only difference in my setup and everything seems to be working except that the device (my TV that uses NEC) is not receiving the IR signal
Thanks Bill for your wonderful teaching courses. One of my IR controllers does not send the FFFFFFFF signal. Can I still use the code but block out the relevant IF statement such that I end up repeatedly pressing the L or R button to progress the servo?
can you make a video about using android phone connected to wifi to control home equipment and appliances??
Hello Bill, About 5 years ago I bought a Mitsubishi MSZ-FH35VE airco/heat pump which I use to heat my appartement here in the Netherlands. I can switch between modes: heat, cool, dehumidify and so on, with the MODE button an it shows the code: 64800004 FFFFFFFF The fan speed button, rotating higher speed in 6 steps, gives me exactly the same code. Temperature higher TEMP + button also gives me the exact same code. Your example 2 show it is a SANYO plus an UNKNOWN code. Because this heat pump is no longer manufactored and it has no buttons on… Read more »
Hi Herman. I suspect your remote uses a longer code (i.e. 24-byte) than most TV remotes use, I have noticed this with one of my own (Frigidaire) air conditioners. It’s not an uncommon problem and so far the only solutions I have seen involve a lot of coding instead of using libraries. I might tackle this problem myself later in the year when the summer comes and I want to automate my air conditioning. I have a total of 5 window-mount units from various manufacturers so it would be a good IoT project and would allow me to “pre-cool” the… Read more »
hi Mr Bill , Im working on an air conditioner remote control and i find a problem to send the code , can you help me plz
Hi ibtihel. It’s likely that your air conditioner uses a 32 or 64-bit code, not one of the standard codes used with televisions and audio equipment. Unfortunately, that would require encoding the IR pulses manually unless you (or some other reader) knows of a library for these types of IR codes.
hello thank you for replying, i think it is a protocol problem because it works with an air conditioner which uses NEC protocol but i need it with SAMSUNG . and concerning manual encoding i have no idea about it ..
When it comes to heat pump AC units that use IR, most will send all the information every time. That would be mode, fan setting, vane setting, temperature and if it should be on or off. This is to account for times when the remote might have changed a setting and the signal was not received. My Mitsubishi does this and it is actually really long signal as well as a few start and stop code in there as well. There is a fork of the GIT repository that Bill used that is meant for IRRemote 8266. I used this… Read more »
hello thank you for sharing…
I have a 2560 arduino . and at IR Receiver Hx1838 . Remote control too. I hooked up the 1838 . but it got so hot I had to unhook. How can a find the Hex code of my remote. Do I need a different IR receiver? or add a resistor.
I am a beginner.
Thank . You L graham
Noted that my IR button transmitter has the repeat code FFFFFF for every button. The IF command uses an OR statement. Therefore whichever button is pressed FFFFFF always takes over regardless what the code is for the specific button.
for the demonstration code with the red and yellow LED’s, what are is the “Ox” for before the hex code?
I can get it to work with an NEC remote but not with a Samsung remote.
Love your workshop. Can this be used on an esp8266 board? You mentioned must use pin 3 on the arduino board.
Thanks
After a modification to the servo – could the code be designed to provide a continuous travel – left or right – to remotely focus a telescope? I am attempting to build from scratch, a electric focuser for my observatory telescope. Your reply would be very much appreciated. ~ Darrel~
hi i want to use the tv remote for quadocopter can you help me by code
Hello, what is an object? Like when you state “we create two objects for the IR Receiver and the Results.” What does that mean?
Hello, Bill, may you, please, tell me what an object is? Like, when you state “we create two objects for the IR Receiver and the Results.” What does that mean?
Hallo Droneworkshop I’m John 72 what do you do if the codes sent from your remote are loads of different codes from the same button and make of controller unknown just need help where to start. I have LG tv and have fllowed your tutorial to the letter and every thing works TV on and Off no problem just dont know how to get the recorder box to work as I said befor there are lots of different codes for the same buttons the codes all come after onanother after FFFFFFFF. Hope you can help. Trying to make it so… Read more »
How do you send multiple codes with one button . could you give me an example
hello drone i have connected tsop0038 (SM0038 JF5EJ ) to the arduno without any resistance or capacitance, after i open the serial monitor i see some unwanted code appearing on the serial monitor please guide me
Hallo I am enjoying your presentation very much. It is a lot of pleasure to look and hear your YouTube Films and explanation.
Thank you very much and good luck.
Dieter in Germany
Hi there, just discovered this site and the nice videos and clear explanations to it. perfect!
Question when I run: IR Receiver Demonstration 2
IR-Rcv-Demo2.ino
I receive an error starting after the mitsubishi line, so for instance I can’t get the samsung codes. What is it I do wrong?
greetings,
Frans Macco (Holland)
Hola, muy bueno el proyecto y todas las explicaciones. Te comento que para el Arduino Mega la salida no es la 3 si no la 9. Recien probe y funciona perfecto.
“Hello, the project and all the explanations are excellent. I am commenting to say that for the Arduino Mega the pin is number 9 instead of 3. I just tried it and it works perfectly.”
Hii
Thanks a lot for sharing this awesome project about IR receiver . i am plaining to make IR car using remote control, this will help me alot and wil follow it . thanks once again keep it up with such great idea
Hi Bill,
The ESP-32 tutorial you made are you going to expand on that?
Regards,
W. Browne
Great tutorial, as always! Question: does anyone else have the issue that the IR receiver picks up random data from time to time, like shown in https://forum.arduino.cc/index.php?topic=215699.0? I’ve already tried stabilizing the input voltage of the receiver with a 100uf capacitor as suggested somewhere online (can’t find the link anymore) but that doesn’t resolve the issue. Thanks! Nils
This is great! I have been looking for a hardware and code efficient way to move a model railroad turntable with a stepper motor.
I was inspired by your servo control video.
hello sir i am having aproblem in sending 24 bit ir codes ihave received this code from my remote—–C00001,24 but when i try to send tthese codes by my arduino i receive this—–C000 (16 bits)
so sir please hel pme with this if you can i will be your thankful
Hello Bill:I am a student in 7th and i am very interested in electronics and arduino programming.It would be nice if you made more videos about arduino because i am always waiting for seeing your new video. I and my friend are making a multi-functional car(arduino based),so it would be nice if you made a video about making your own multi-functional car using arduino.Thank you!!
GREAT !!! nice tutorial …
I am using an Arduino Uno and loaded code to read a Samsung remote, and when I tried to load the IR Remote library by Ken Shirriff I received a “loading error” message and was unable to proceed past that point. [code] #include <IRremote.h> // Include IR Remote Library by Ken Shirriff // Define sensor pin const int RECV_PIN = 4; // Define IR Receiver and Results Objects IRrecv irrecv(RECV_PIN); decode_results results; void setup(){ // Serial Monitor @ 9600 baud Serial.begin(9600); // Enable the IR Receiver //irrecv.enableIRIn(); } void loop(){ if (irrecv.decode(&results)){ // Print Code in HEX Serial.println(results.value, HEX); irrecv.resume();… Read more »
Could you expand this workshop to include converting the TV remote from IR to transmitter? Possibly using a TV remote half case added to the back of the first remote to house the works, and a means to use several identical remotes and discriminate among them at the receiver. Mt application is DCC++ remote HO train operation. Thanks, John
Please fix error below “Getting Remote HEX Codes” picture.
I need to do some Arduino programming, and I believe your website and YouTube tutorials are the best. What I am trying to do is to use an IR remote to turn a digital output high momentarily. Holding a button pressed, a digital output goes high, and stays high until the button is released. Realizing the button, digital output goes low, eventually after a short delay. My application is to control audio volume with a motorized potentiometer. I watched other people doing that, but they used servo (stepping) motors… not good for my Alps motorpots. I hope to learn… Read more »
… my typing… at the last post; instead of “Realizing” please read “Releasing”.
Thank you for your tutorial. I was trying to figure out how to capture the codes and someone referred me to this site. It has been so helpful so far! I was so excited when I got the Serial Monitor to display the code on my remote. I did run into some problems..I was able to figure out the 2 error messages in the IR Receiver Demonstration 2 which were… exit status 1 1)’MITSUBISHI’ was not declared in this scope 2)’AIWA_RC_T501′ was not declared in this scope I simply deleted those two cases and it was able to run. Question;… Read more »
Update: I was able to find why I was getting the error ____was not declared in this scope. I failed to put the 0x before the 8 digit hex code.
Very useful to a newcomer to Arduino and Remotes in particular
I have two boards set up. One I am running the IR_Receiver_Demo2 and displaying the recieved code to my serial monitor. The other I am running IR_Transmitter_Demo1. When I push the button the transmitter is supposed to send the Power code command, however although it does read a code the code displayed does not match the one that is supposed to be sent. I tried changing the code to a different code {irsend.sendSAMSUNG(0xC4FFB647, 20)}, however still the received result {11B14234} Does not match. What am I doing wrong?
Same problem here.
I send:
irsend.sendNEC(0xFEA857, 32, 3);
I receive:
Protocol=NEC Address=0x57 Command=0x20 Raw-Data=0xDF20A857 32 bits LSB first
Just finished modifying the green yellow ir remote now driving two relays.
Thanks for your great work to make it easy for us : – ))
Working as an Electronics teacher in the local high school (South Carolina, USA). I had never used an Arduino before, but coming from an engineering and computer programming background I’ve found it to be very useful for demonstrating concepts from both fields. My problems have largely come in the form of not being sure why I want to use one of the pieces from the kits I have in my room. After watching your videos, that’s not a problem anymore. Your explanations and demonstrations are the best I’ve come across. You make the material very understandable. Thanks for all you… Read more »
I tried to get the codes for my tv remote, got all the connections correct but my serial monitor shows just a ‘0’ instead of the code every time I press the tv remote button.
please help.
same here
With the release of version 3 of the IRremote library the code in these examples no longer work.
When I run your code I get the error: The function decode(&results)) is deprecated and may not work as expected! Just use decode() – without any parameter.
It’s referring to this line: if (irrecv.decode(&results)){
When I remove the &results it runs but only returns a 0.
I am using the library IRremote by Shirriff 3.0.0
Thoughts
Dave
I’m experiencing the same issue
Here is the working code 🙂
// Include IR Remote Library by Ken Shirriff
#include <IRremote.h>
// Define sensor pin
const int IR_RECEIVE_PIN = 11;
void setup(){
// Serial Monitor @ 9600 baud
Serial.begin(9600);
// Enable the IR Receiver
IrReceiver.begin(IR_RECEIVE_PIN, DISABLE_LED_FEEDBACK);
}
void loop(){
if (IrReceiver.decode()){
// Print Code in HEX
// Serial.println(results.value, HEX);
Serial.println(IrReceiver.decodedIRData.decodedRawData, HEX);
IrReceiver.resume();
}
}
I ran into same issue, I found this resource but sill could not get to compile. https://github.com/Arduino-IRremote/Arduino-IRremote#converting-your-2x-program-to-the-3x-version
did you get it to work
Hi all
I am trying to develop a 360-deg rotating device, so I need to make sure that signal can be received from any angle.
Would the parallel connection of the IR receivers work?
As long I know, connecting diodes in parallel it’s not a quite common practice due to reversed voltages.
Also, how to define current-limiting resistor(s) for IR-receiver diodes once they are in parallel?
Thanks everybody.
Andrey
Tried to compile sketch #1 at top of article. Receiving an error: D:\Documents\Arduino\DroneBot_IR_Remote_02_08_2021\DroneBot_IR_Remote_02_08_2021a.ino\DroneBot_IR_Remote_02_08_2021a.ino.ino: In function ‘void loop()’: D:\Documents\Arduino\DroneBot_IR_Remote_02_08_2021\DroneBot_IR_Remote_02_08_2021a.ino\DroneBot_IR_Remote_02_08_2021a.ino.ino:30:29: warning: ‘bool IRrecv::decode(decode_results*)’ is deprecated: Please use decode() without a parameter. [-Wdeprecated-declarations] if (irrecv.decode(&results)){ ^ In file included from D:\Documents\Arduino\libraries\IRremote\src/IRremote.h:99:0, from D:\Documents\Arduino\DroneBot_IR_Remote_02_08_2021\DroneBot_IR_Remote_02_08_2021a.ino\DroneBot_IR_Remote_02_08_2021a.ino.ino:12: D:\Documents\Arduino\libraries\IRremote\src/irReceive.cpp.h:1003:6: note: declared here bool IRrecv::decode(decode_results *aResults) { ^~~~~~ Sketch uses 6890 bytes (21%) of program storage space. Maximum is 32256 bytes. Global variables use 571 bytes (27%) of dynamic memory, leaving 1477 bytes for local variables. Maximum is 2048 bytes. Serial Monitor on Com5 displays repeatedly the top line, and only a 0 when any remote button is pushed:… Read more »
Hi Bill, 1st, thank you so much for your videos! in doing the IR transmission test, i am having trouble with the following code. (note: the remote hex is my remote button)
// If button is pressed send power code command
if (buttonState == HIGH) {
irsend.sendNEC(0xA05F5FA0, 32);
When I try to compile, i keep seeing the following error,
no matching function for call to ‘IRsend::sendNEC(long unsigned int, int)’
I am new to this and any help would be appreciated. Thank you! Ron
this code doesn’t work with the 3.0 and up library ; I can’t figure out how to convert it
I have same problem…followed update instructions but code cannot be verified.
Hello Droneworkshop, THIS IS AN EMERGENCY. I’m building a prop for a theatrical production and need to get this code working within the next 2 days. I’m getting a message within the serial monitor saying:
“The function decode(&results)) is deprecated and may not work as expected! Just use decode() – without any parameter.”
Please help.
IF ANYBODY ELSE CAN HELP WITH THIS IT WILL BE GREATLY APPRECIATED
// Include IR Remote Library by Ken Shirriff
#include <IRremote.h>
// Define sensor pin
const int IR_RECEIVE_PIN = 4;
void setup(){
// Serial Monitor @ 9600 baud
Serial.begin(9600);
// Enable the IR Receiver
IrReceiver.begin(IR_RECEIVE_PIN, DISABLE_LED_FEEDBACK);
}
void loop(){
if (IrReceiver.decode()){
// Print Code in HEX
// Serial.println(results.value, HEX);
Serial.println(IrReceiver.decodedIRData.decodedRawData, HEX);
IrReceiver.resume();
}
}
HERE USE THIS CODE WORKS LIKE A CHARM
So, this code gets me better numbers. Thanks. Guess my IR receiver is working fine.